THE VINTAGE FERRARI SPECIALIST

Gas Tank and Engine Prep

September 30, 2011


9/30/11
Gas Tanks and Engine Prep

dented tank

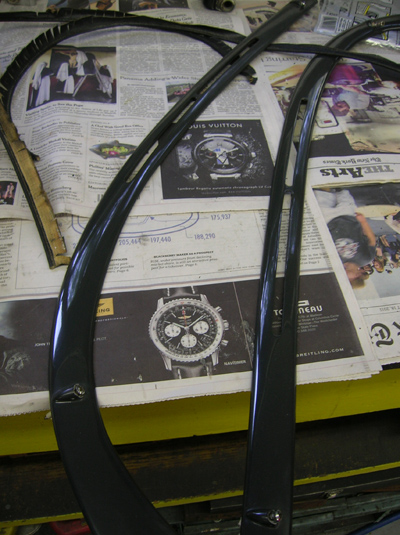
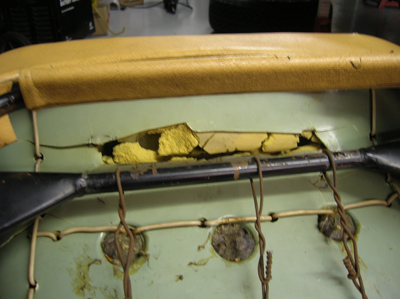
Continuing work on an Interim 330 at the shop we wanted to fix a pretty bad dent in gas tank. It looks like sometime in its past, a jack was used at the bottom of the gas tank to raise the car. Unfortunately, the weight of the car was no match for the strength of the gas tank, so it was bent in the center. I was amazed the soldered seams did not split, but the owner wanted us to fix the dent in the tank.
dent removed

Francois has some tools he made specifically for taking these dents out and we worked together to pull most of the dent out of the tank. We’ll send it out for pressure testing and seal up any leaks. Hopefully with some care, no one will try to jack the car up by the gas tank again!
engine assembly

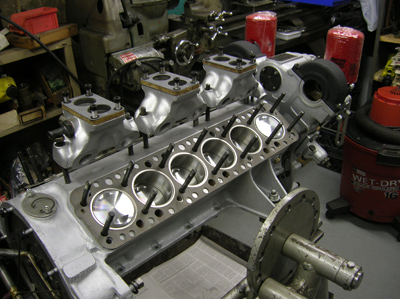
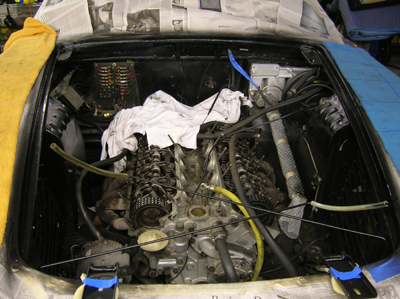
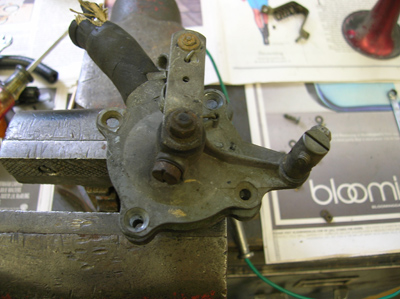
The bottom end of 2259’s engine is coming together nicely. Francois finds the evenings the best time to work on rebuilding an engine because the phone stop ringing and there’s less distractions. Every morning when I come in, I see more progress.
throttle shaft

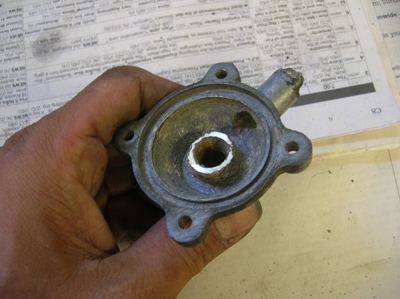
My job during the day is to prepare the small parts that will need to go back on the engine as the Frenchman needs them. Finding pieces like the accelerator rod bearing stands and bearings also includes inspecting, cleaning and greasing the parts before putting them back in service.
knobs

Now is as good of a time as any to clean and polish the black plastic knobs that go on the valve covers. A few minutes on the buffing wheel will make these knobs look great on a fresh engine.
valve covers

The valve covers were powder coated by the previous owner, and the grain is a little too fine for my tastes. Powder coating is very durable, but the wrinkle finishes I’ve seen don’t wrinkle enough!
chain covers

There were a couple of masking issues that needed to addressed. The chain cover cap that was powder coated was masked improperly, and an area where a crucial oil seal was painted. I had to carefully scrape and strip the powder coating in this area so the oil seal would work properly.
other side

The same problem showed up on the other side of the cap.
brake resevoir cap

Speaking of paint. Here’s the brake reservoir cap that has been on this car since at least 1969, and clearly shows black paint on the blue FIAT logo. I know Ferrari judges allow for either black paint or the blue FIAT tag to show on this cap, but I just wanted to show this data point to the judges! But I digress…
water pipe

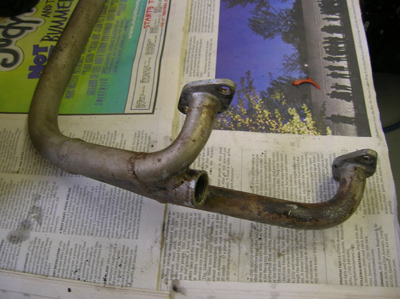
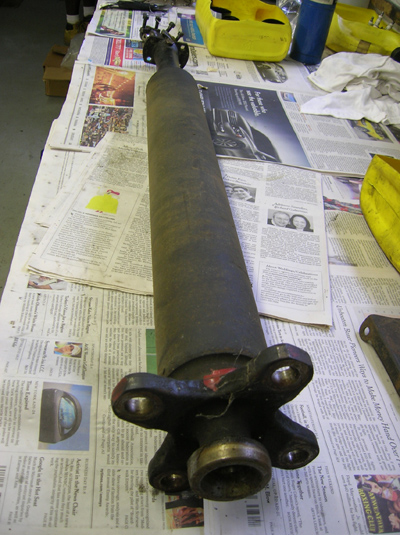
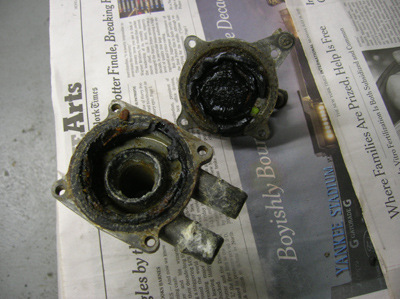
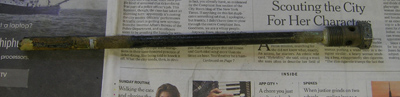
The coolant pipe that runs along the left side of the engine needed cleaning a plating. It’s supposed to be nickel plated, so I cleaned it to prepare if for the platers.
pin holes

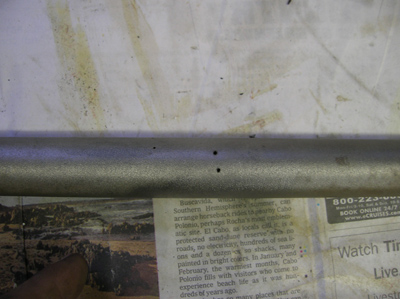
After a thorough cleaning, I noticed small blemishes in the pipe that when poked with a scribe, turned into pin holes.
more holes

The more I looked, the more I found, and soon I found enough to realize a large section of pipe if not the whole thing may have to be replaced. Coolant must have sat inside this pipe long enough to have rusted from the inside out.
rust

The whole pipe showed little rust spots that when some of them were poked, showed more pin holes. If we patched what we found, I’m sure other thin spots would leak in the future. Time to see who’s making this pipe in reproduction!

Reminder: If you have a Ferrari related project, car, or idea you’d like to explore, I’d love to talk to you. I can also help if you’re thinking of buying or selling. This website represents what I love to do, and now it’s how I make a living, so if you’d like to do something together, let me know. It all begins with an e-mail!

Previous Restoration Day
Next Restoration Day
Home page

Drive Line and Leather Cleaning

September 28, 2011


9/28/11
2259 Drive line and Leather Cleaning

driveshaft

This week, we’re working on the GTE drive line. The drive shaft and associated parts need to be sent out for balancing, and it began with removing the old paint from the drive shaft.
visconti

Written in Crayon was “Visconti,” or “Nisconti” on the drive shaft. I have no idea what this means, but I figured I would take a picture of it before I took the paint off.
u-joint

The u-joint showed damage on the bearing surface, so we had to replace it.  Luckily I had a good u-joint to replace the worn or damaged pieces, but we kept the old parts. The surface of this u-joint can be repaired with hard chrome, but only when we run out of good spare parts!
package shelf

I started taking some of the panels out of the car to thoroughly clean them and moisturize the leather. Horizontal surfaces like this rear package shelf had a lot of dust settling onto the leather and it really needed to be cleaned.
holes

I inspected the defroster holes cut into the leather panel to make some notes on how it was done. The holes are remarkably straight. The leather where the holes were cut is also very thin. It looks like the leather in this area was skived thin before the holes were cut with some kind of template.
rear panels

I was looking for a spot for rear seat belt mounts at the request of the owner when I saw how dirty some of the rear panels were. The foam underneath these panels was also crumbling away and needed replacing.
panels

The leather pieces are in very good shape despite the desperate need for some cleaning.
before after

A soft brush and leather cleaner took out a lot of the dirt trapped in the grain of the leather. The left side is the panel I cleaned.
transmission

The transmission was pulled out for inspection and light service. I began by checking the condition of the shifter bushing and the electrical switches. The overdrive safety, and back up light switch all checked out, but one cover needed to be fabricated to make the switch weather proof again.
drained

With the inspection cover off, we took a look at the gear sets. Everything looked nice and clean, with no broken gears or excessively worn synchronizers. The gear oil, although over  forty years old, drained out nice an clear.
seals

The two outside oil seals on this transmission were hard as a rock so replacements are on order.
internal number

The internal number on the transmission case is easiest to see when the transmission is out of the car, and this one reads “40 E”

Reminder: If you have a Ferrari related project, car, or idea you’d like to explore, I’d love to talk to you. I can also help if you’re thinking of buying or selling. This website represents what I love to do, and now it’s how I make a living, so if you’d like to do something together, let me know. It all begins with an e-mail!

Previous Restoration Day
Next Restoration Day
Home page

GTE Seats

September 22, 2011


9/22/11
GTE Seats

crumbs

I decided to take a look at the inside of the seats on the survivor GTE I have at the shop. I took a seat home to disassemble the seat cushion to see if something can be done about the crumbling foam. Just moving the seat over to my work bench left more crumbs of dry rotted foam on my floor, so you can imagine the mess these seats would leave on the floor of car if left the way it was.
broken shell

As I found last time, a repair was made to try and support a broken seat bottom. The Series I GTEs used a vacuum formed bucket to hold the seat foam in place, and it cracked pretty easily.
recliner

As I began the disassembly, I learned something I never knew about SI seats. The seat backs are actually adjustable! There’s a seat stop that can be turned in several positions that allows the seat back to sit at different angles. As I was taking the seat back out, I discovered this adjustment for the first time. I’m either going to enlighten SI GTE owners, or sound very naive!
recliner

Here’s a shot of the adjuster in a different position.
foam

I managed to peel the leather off the seat shell, and foam padding without damage. Much of the foam is still in good shape, but the parts that were exposed to the outside air has hardened, and is crumbly. We will probably have to replace all the foam with new foam to insure it doesn’t crumble again. I spoke to our upholsterer about this project, and he felt it would be great to try and get the original latex foam as a replacement instead of the modern polyurethane foam. The latex foam is much softer and has a different feel compared to the harder modern foam.
mattress

Years ago when I upholstered my seats in the 330 America, I purchased a twin sized mattress made of this latex needle foam to duplicate the feel in my seats. I carved each cushion with an electric knife and sculpted the foam into shape. The results were great, but I don’t expect many people to go through the lengths to get the right “feel!”
leather

These seats will need new muslin substructure sewn in, but so far everything looks good. I have fiberglass seat pans on order, made from molds I made years ago for another car, so the next test will be to see how well these old seat covers fit the reproduction pans.

Reminder: If you have a Ferrari related project, car, or idea you’d like to explore, I’d love to talk to you. I can also help if you’re thinking of buying or selling. This website represents what I love to do, and now it’s how I make a living, so if you’d like to do something together, let me know. It all begins with an e-mail!

Previous Restoration Day
Next Restoration Day
Home page

Yes, Another Barn Find

September 17, 2011


9/17/11
Yes, Another Barn Find!

275GTS

I got a call several months ago from a guy that got my number from a mutual friend. John Upshall told me he was a long time Ferrari enthusiast and our mutual friend thought we should meet. As we talked I learned John and I both had previous television careers, and a similar passion for Vintage Ferraris. Over lunch a few days later, we talked about our favorite subject when John told me about an old Ferrari he knew about in Long Island. At this point he really had my interest.

John told me about Lee Branagan, and how he owned this 275GTS that had not run since the mid 70s. John met Lee about 20 years ago, and talked to Lee on and off for the last 10 years about selling his car. Recently, Lee’s health has deteriorated to the point where selling the car was a priority.  As we talked, John told me about the various people who had come down to see the car, and even a message he posted on F-chat! As this neophyte Ferrari chaser told me what he had done, I was surprised none of the “usual suspects” had not come to Lee’s house to buy the car from him. John asked me if I was interested in meeting Lee and if I could help.

Being offered an opportunity like this may only come once in a lifetime, but how it was handled was very important to me. If the car was what John described, then it was worth findng the right buyer to restore this car. I was not interested in making a quick flip to profit from Lee’s predicament, but I wanted to help him find his car a good home for a fair price. If I could be involved in the restoration, and post the progress on this website, then everyone in the Vintage Ferrari world could benefit! I needed to act quickly, but respectfully.

When I told Francois about this potential project, he was very interested in taking on the restoration. After my association with Francois for the last 15 years, he has come around to seeing the benefit of the Internet and reach of my website. To have my mentor behind me in this project was a big piece to this puzzle. He even volunteered to come with me to inspect Lee’s 275GTS.
uncovered

Lee is a retired Airline Pilot, and he bought this car in Milan in 1970. He was in the market for a Porsche, but when he saw his first Ferrari, he knew what he had to do! He paid $5700 US for this 275GTS, and had the car flown to the States. After a few years of driving it around Long Island, and occasionally parking it at JFK ariport to catch a flight, Lee parked it in his garage in 1975. “I got married, and had kids!” was Lee’s reason why he couldn’t find time to keep his Ferrari running.
275GTS

In the early 90s, John Upshall was at his friend’s house in Long Island for a neighborhood barbeque. The subject of John’s obsession with Ferrari’s came up, and Lee’s daughter exclaimed, “my Dad has an old Ferrari in his garage!”
John, figuring it was probably a 308, asked for more information.
“No, it’s not a 308. It’s an older convertible.”
With beers in hand, they walked next door and took a peek under a cover to find a very dusty Ferrari 275GTS!

John and Lee talked, and that was when he started asking around for advice. When a car like this is exposed to the light of day, many people start closing in. There are so few opportunities like this in the Ferrari world that competition is fierce, but Lee managed to hold onto the car.
nose

When we went out to see the car for the first time several months ago, we found a complete car, but in dire need of EVERYTHING! Almost all the body panels were dented, scratched, or marked, but as Francois and I took inventory, most all the pieces were accounted for, despite the years of neglect.
engine

The engine had not been run in years, so a rebuild was definitely in its future.
interior

The soft spot in my heart was beating rapidly with the prospect of bringing this old girl back to life. I imagined the opportunity to restore another Vintage Ferrari with Francois, and document it on the web for everyone to share, but I had a monumental task ahead if I was going to reach my goal. First I had to come up with a buyer with the same sensibility and vison of having me and Francois restore the car. Second, the buyer would have to be open to sharing the restoration progress on tomyang.net. Third, I had to come up with an agreeable price between the buyer and the seller, and Fourth, I had to do all this without attracting the attention of others that could come in and buy the car out from under us!
Lee

Five months later, after countless phone calls, a couple of visits, and some excitied discussions, I found the buyer, met at a price, and agreed on today to close the deal. Lee’s final request was to have a chance to photograph his grandchildren in the car before we took the car to our shop and I was happy to oblige.
the kids

I love what I do for a living, but this aspect is something I find very hard to do. If you’ve ever watched the movie “Citizen Kane,” you’ll understand that our Ferraris are our “Rose Buds,” and selling it is not so easy. I tried my best to be repectful and fair because I too will one day be in Lee’s position when it comes time to sell my 330 America. I only hope I have someone who will do right by me!
on the truck

As I looked out behind the rollback to see Lee’s old 275GTS, I could barely believe I got it! I had to live in secrecy about this car for months while I worked very hard to find the right person to buy it. Luckily he was right in front of me among my customers, so it was a match that was meant to be. I still want Lee to be a part of this restoration by following along with everyone else on this website, and maybe even get to drive his old girlfriend again when we’re done!

Reminder: If you have a Ferrari related project, car, or idea you’d like to explore, I’d love to talk to you. I can also help if you’re thinking of buying or selling. This website represents what I love to do, and now it’s how I make a living, so if you’d like to do something together, let me know. It all begins with an e-mail!

Previous Restoration Day
Next Restoration Day
Home page

Road Trip to Illinois

September 10, 2011


9/10/11
Road Trip to Illinois

Dyke Ridgely offered a batch of 330GT 2+2 parts from a car that was made into a replica. Although I stood the chance of holding on to these parts for as long as Dyke had them, I felt they were worth buying. Getting them was also a great excuse for a road trip and a chance to meet Dyke and his wife Sue!

indy

Choosing the right companion on a long road trip can make or break a road trip. It’s a long time to spend in a car, and the wrong driving partner can make a long trip longer! I called my friend Mike Meehan, a 365GTC/4 owner and fellow gear head to help with the 2000 mile round trip to Illinois and back. We decided to drive through the night from Upstate NY through PA, OH, IN, and IL. I took my wife’s car for the weekend because it was the most fuel efficient, and would probably hold all the parts. With only a weekend to do this trip, we had a lot miles to cover.

Bad food on the interstates is a given when traveling in America, but I didn’t seem to fight it when I found myself stocking up on peanut M&Ms and beef jerky during our gas stops. I normally refrain from eating such stuff, but there’s something extremely satisfying about stuffing my face with junk food while the miles roll away! When I was in college, road trips involved a lot of coffee and cigarettes, so I guess beef jerky is healthier!
the Ridgleys

Dyke and Sue Ridgely gave Mike and me the full tour of their shop and personal collection of cars. Although I heard about the Ridgely’s through their long time involvement with Ferraris, their taste in cars spans as far back in time as the Marmon we’re seen standing in front of in their shop!

We spent several hours talking about their collection and involvement with cars. There was a strong Ferrari presence in the Chicago area when the Ridgelys bought their first Ferraris in the early 70s. Dyke and Sue have many stories about driving them, breaking down in them, and fixing them. I was very excited to talk shop with Dyke and hear his opinion on many technical aspects gleaned from years of restoring, prepping, and racing his and customer cars.
Ferrari parts

Soon our time had come to load up the car with our booty and head back east. We managed to squeeze everything in the back of he car with hardly any room to spare. My new motto should be “Pack Tight, Drive Fast!”

Reminder: If you have a Ferrari related project, car, or idea you’d like to explore, I’d love to talk to you. I can also help if you’re thinking of buying or selling. This website represents what I love to do, and now it’s how I make a living, so if you’d like to do something together, let me know. It all begins with an e-mail!

Previous Restoration Day
Next Restoration Day
Home page

2259 Brakes and Electrics

September 9, 2011


9/9/11
2259 Brakes and Electrics

pedal box

Since I was replacing the brake lines on the Survivor GTE, I decided it was easier to pull the pedal box out of the car to gain access to the lines. While the pedals were out, I put the unit in the wash tank, and cleaned out the accumulated dirt. 
cleaned

I’m always amazed how well this car cleans up. The pedal box looked almost brand new without any fresh paint.
instrument dimmer

While I was poking around the inside of the car, I noticed a problem with one of the switches inside the center console. From the look of the resistor wire, I could tell the instrument dimmer switch had broken. Now was the time to pull this switch and re wrap the wire.
resistor wire

The switches are very simple in design with a contact blade that sweeps across a resistor wire. As the resistance increases with more wire to feed the instrument lights, the dimmer the lights will get. When a wire catches on the contact blade, it breaks and unravels from the drum.
rewound

There was enough of the original wire for me to re wrap most of the wire back on the switch. Now we’ll have working instrument lights!
seat back

I pulled the back seat out to gain access to the back panel, but while the seat was out, I moisturized the leather. I try to do this will all the leather surfaces whenever I can to bring this interior back to life.
brakes

Parts are getting bolted back on the car! The shocks and gas tank are installed, and I’m now working on getting the brakes sorted.

Reminder: If you have a Ferrari related project, car, or idea you’d like to explore, I’d love to talk to you. I can also help if you’re thinking of buying or selling. This website represents what I love to do, and now it’s how I make a living, so if you’d like to do something together, let me know. It all begins with an e-mail!

Previous Restoration Day
Next Restoration Day
Home page

Interim 330

September 4, 2011


9/4/11
Interim 330

engine compartment

We have a Interim 330 in the shop where we’re detailing the engine compartment. The engine is strong, but the engine compartment really needed a freshening. Although this picture shows a lot of black, we stripped and sanded all the inner sheet metal, took off all pieces that could come off, and sent all the various pieces out for plating. Once the paint was applied, I pulled the old heater hoses off and replaced them with the correct spiral wrapped hose. The next step is to reinstall all the plated pieces that will give this engine compartment some contrast!
heater control valve

While I was replacing the heater hose, I took a look at the heater valve. It was stuck and needed closer inspection. Once I got the body open, I found the rubber diaphragm completely disintegrated. The leaking seal caused the valve to seize in the body of the unit.
seized valve

I used a torch to carefully heat the assembly while turning the valve. Eventually, it worked itself loose and moved freely. With a new diaphragm, we’ll be back in business!

When Francois and I talk about this car, I refer to it as an Interim 330 which is a name given to it later in life, so Francois had not heard of this term before. It’s much like when the 250 Pininfarina Coupe was simply known as a 250GT when it was new, the PF name was added later on to distinguish it from Boano and Ellena built cars. Since he worked on these cars when they were relatively new, he often does not use the newer distinctions to tell the cars apart.

When 330 cars were new, they were simply knowns as 330GT 2+2s, but as they aged, we categorized them in three separate groups. The Series I 330GT 2+2s had four headlights, and the Series II 330s had two headlights. The Series I cars had 4 speed transmission plus an English overdrive unit, along with floor mounted pedals, while the Series II cars had a true 5 speed transmission with modern hung pedals in the driver’s compartment. Soon it was realized there was a third variant of the 330GT 2+2 where the cars had the body of a Series I car, but the mechanicals of the Series II car, thus the “Interim 330” name.  With only about 125 cars made before Pininfarina built the SII body style, there aren’t many Interim cars about.  That’s a quick refresher course on Interim 330s! I have a spotter’s guide if you want to see more.

Reminder: If you have a Ferrari related project, car, or idea you’d like to explore, I’d love to talk to you. I can also help if you’re thinking of buying or selling. This website represents what I love to do, and now it’s how I make a living, so if you’d like to do something together, let me know. It all begins with an e-mail!

Previous Restoration Day
Next Restoration Day
Home page

Back to Work on 2259!

September 2, 2011


9/2/11
Back to Work on 2259!

frame

I got back from Monterey with a ton of work to do! Having shown David Eichenbaum’s 250PF Coupe as true “survivor car” in Monterey, I was excited to get back to work on 2259, the latest survivor car I’m bringing back to life. With the engine out of the car, I can focus of cleaning up some of the frame sections and painting some areas where the it has flaked off.
paint

Some of the hardware could use some cleaning and fresh paint.
trim strip

The trim pieces below the rockers were pretty badly chipped, so I decided to take them off, strip the paint, and paint them.
dash

The dash was put back on the car after I had a new heater core installed. I moisturized the leather dash again, laid out the wiring so I could begin putting the gauges back in the dash.
dash

The trim under the windshield had to be cleaned and polished before I installed them back on top of the dash. After sitting dormant for over 40 years, a lot of dust worked its way into the paint, so I needed to make sure I cleaned these pieces thoroughly before putting them back in a place with limited access. The original vinyl piping was glued back to the painted trim pieces.
fuel pick up

Jumping over to the fuel system, I started putting the parts to the fuel tank together which began with the fuel pick up.
pick up

After stripping the corrosion off the pick up, I found the tip rotted off, and the bottom part of the pick up tube showing corrosion. A new pick up tube will have to be soldered in place of the old one.
tank

The gas tank was ready to go back in the car. The car had to be put very high in the air so the tank could slide under the car. A new fuel filler hose was installed along with all the gaskets for the access door.
heater valve

As I was working on the under hood detailing, I looked at the heater shut off valve. It seemed to be working fine, but I decided to open it up to take a look inside.
heater control

I’m glad I looked, because even though the rubber diaphragm was in great shape, there was a bunch of corrosion inside the valve nearly blocking up the whole assembly. With a newly cored radiator and heater core, it would be a shame to have this stuff work itself loose and clog up the works!
seal face

After cleaning up the assembly, I saw the face of the shut off valve where the rubber diaphragm seated was pretty rough from the corrosion. I mounted the valve in the lathe, and took a little material off the seating surface to make for a better seal, but being careful not to take too much material off so the valve would still reach!
seats

I had a conversation with the owner of 2259, and we discussed the shape of the seats. The leather on the seats are in remarkable condition, but foam is in bad shape. Ferrari seats often suffer from dry rotted foam which turns to dust over the years, leaving crumbs on the carpets every time someone sits in a seat. The current owner wanted to see if there was anything we could do to change out the foam but keep the original leather. I have always resisted this job because I was always afraid of damaging irreplaceable leather when removing them from a seat. I’ve heard of upholsterers successfully re padding old seats, but I have not done it myself. I have experience reupholstering new seats, but I was heading into uncharted territory. The owner was willing to take a chance with my ability, and I told him I would try my best. We’ll see how this turns out. Just like the headliner with 1747, we might learn something by pushing our limits!
repairs

On closer inspection, 2259’s seats already had a problem in the past, and a repair was attempted.
repairs

Series I and II seats have a vacuum formed bucket that makes up the seat pan. This bucket is very fragile, and often cracks. A previous repair tried to support the cracked seat pan with wire. The fact that this car has about 20K Km on the odometer and this car had not been driven since the late 60s, shows how quickly these pans broke! Later Series III GTEs used a rubber support structure. The crumbling foam, however, remained.
seat pans

A few years ago, we replaced the seat pans in a Series II GTE with fiberglass ones me made from molds taken off an intact original pan. The fiberglass is thicker and stronger, and did a much better job at supporting the occupant.
seat pan

The new pan fit very nicely on the old frame of the seat. I called to have my fiberglass guy make another set from the molds he has in stock so I can see how well they fit on the original leather seat covers. Wish us luck!

Reminder: If you have a Ferrari related project, car, or idea you’d like to explore, I’d love to talk to you. I can also help if you’re thinking of buying or selling. This website represents what I love to do, share, and how I make a living, so if you’d like to do something together, let me know. It all begins with an e-mail!

Previous Restoration Day
Next Restoration Day
Home page