THE VINTAGE FERRARI SPECIALIST

Finishing Out the Year

December 30, 2011


12/30/11
Finishing Out the Year

2011 has been an exciting year with some good projects to work on and share with you on this website. The Survivor GTE is coming together nicely, and the 275GTS is well into her complete restoration!
center console

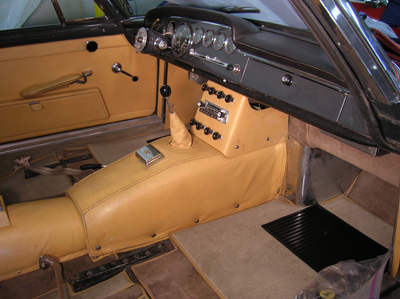
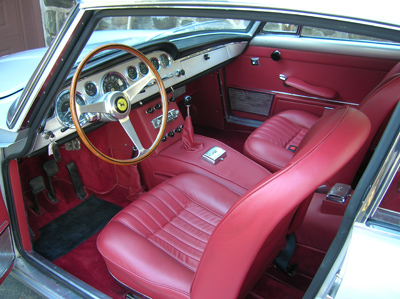
I’m really getting excited about the GTE, as the interior nearly finished. There are only a couple of wrinkles in the transmission tunnel, but I think these will fade as the leather is allowed to take a set. The newly sewn carpets look great, and all I’m waiting for now are the front seats from our upholsterer. For eagle-eyed viewers, you can see a stainless steel kick panel covering the forward part of the passenger compartment foot well. These pieces came with the car, but I don’t believe are original to the GTE. I’ve never seen these on other cars, and there are all the correct snaps for the carpet pieces under this panel. I’m thinking of eliminating these panels, but was wondering if anyone has seen these panels on other early GTEs?
shifter boot

Another small detail I wanted to point out on this GTE was the height of the shifter boot. A lot of upholsterers sew replacement boots all the way up to the top of the shift knob, but this original one leaves some of the shift lever exposed.
parking brake boot

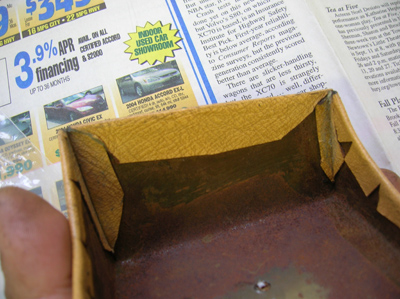
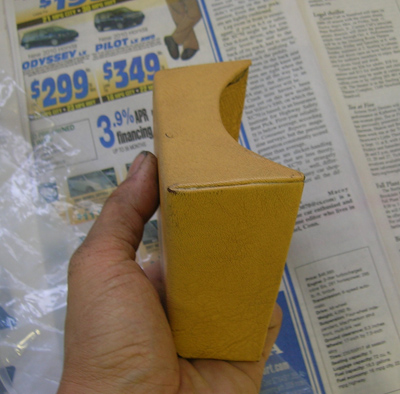
Speaking of boots, I spent some time rejuvinating all the leather on this car and that included the parking brake lever cover. Although the leather was saved, not so much could be said about the stitching which rotted and came apart at the seams. At first I though about taking this piece down to the upholsterer for re-sewing, but I remembered the words of Frank Segreto, by upholsterer mentor, who said that sewing over leather that had already been stitched will weaken it much like perforating a piece of paper. After thinking about how to save this piece of leather, I decided the only way to resew this piece of leather would be to hand stitch it, threading the needle through the exisiting holes.
radiator hose

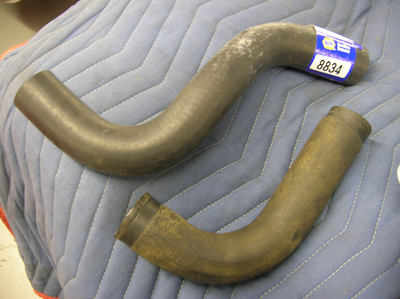
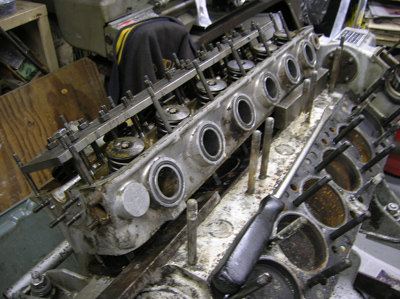
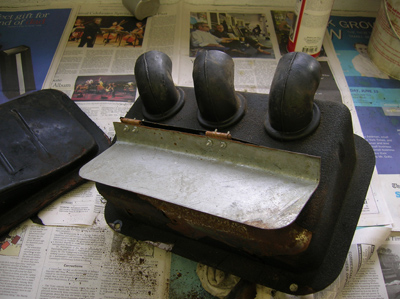
We chased down some small pieces to finish up the engine compartment. I found a match for the hose at my local NAPA store for the lower radiator hose. “8834” will be the best replacement after we cut the portion we need.
clamps

We sent out the original Cheney hose clamps out for plating and found some original ones that were missing. Reproductions are available, but don’t offer the same clamping force as the original ones. Unfortunately, our stock of large clamps are dwindling down to nothing! If anyone wants to sell me their stash, let me know!
heater valve

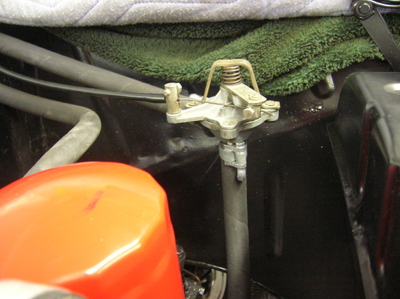
The heater hose got the appropriate clamps.
trunk

We were using the trunk to store many of the parts that go on the car, but with most of the pieces installed, I could finally finish the trunk area.
trunk panel

All the original trunk carpeting is present and in great shape.
gas cap

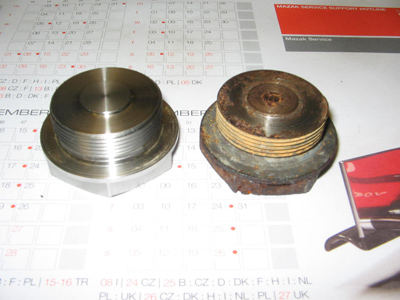
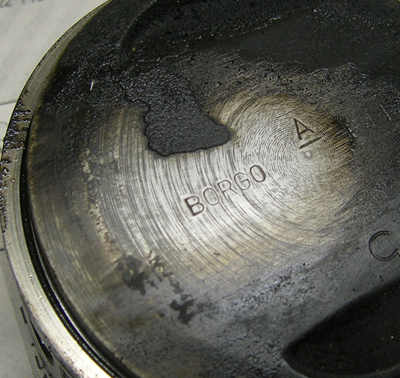
While I was in the trunk area, I remembered to address the fuel filler cap. The rubber used on the orignal caps melts in the presence of modern fuel, so we’ve been replacing them with fuel safe cork.
cork installed

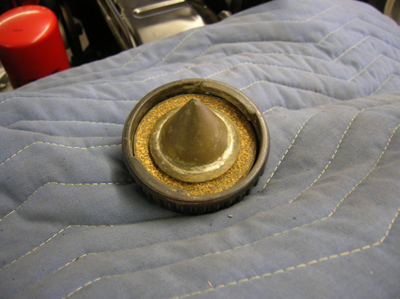
The original rubber gasket had to be cut out and the new cork gasket squeezed into place.
outside

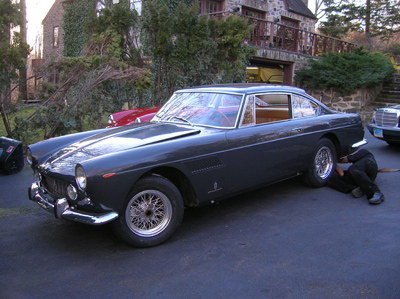
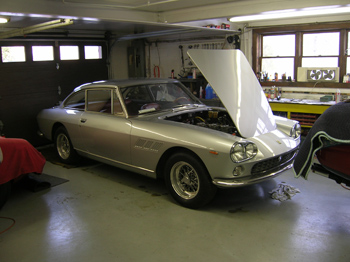
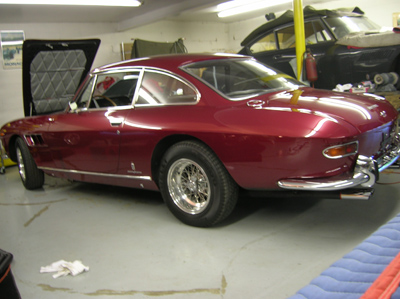
We installed the hood and brought the car outside to turn her around in the shop. We still have the rear exhaust section to deal with, along with some carburetor work, but she’s looking great!
330GT

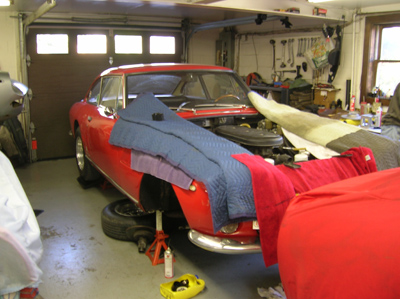
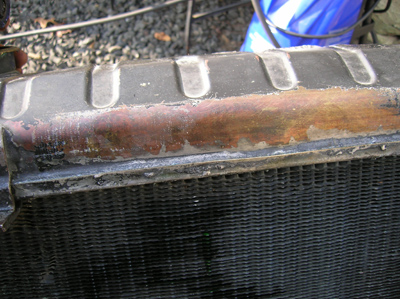
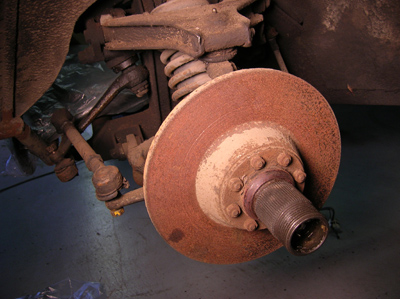
Last week, I had a 330GT in the shop for a short list of repairs. The right front wheel bearing and radiator core was replaced, but I had one more issue to look at with the passenger side seat. The owner said the seat adjuster was not latching and the seat rocked in the mounts. There are several different seat rails Ferrari used in this era car, but I had a pretty good idea of the problem.
tracks

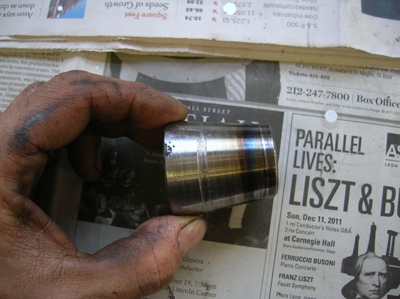
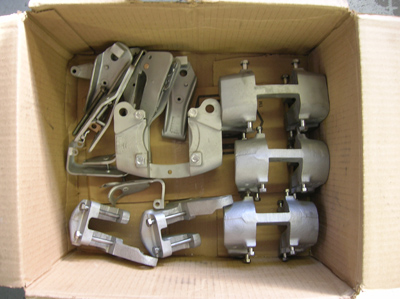
The tracks in this 330 were the type with ball bearings in the track. You can just make out the groove made by the ball riding down the center of the track in this picutre. A few balls were missing, and this was causing excessive play in the seat rail. Through the years of use and wear, the balls pop out of the tracks and once one ball pops out, the rest will soon follow. Luckily, this 330 still had two of the original sizes left in the track for me to measure and order some replacements.
ball bearings

Two large balls ride in the center of the track, while four smaller balls ride on the edge of the track rail. Replacing them so everything stayed in the correct order and placement requires a specific sequence of bending open the rails, inserting each ball, and carefully bending things back in place to secure the balls.
GTC

A newly purchased GTC was dropped off at the shop for us to sort out a couple minor details. It’s a very nice car with a fresh restoration, but as with most old cars, they always need some fettling.
four headlight

It was fortuitous for the owner to have brought the car to us when he did because he was having the same rocking issue with his seat rails! When I took one seat out, I found ALL the balls were missing.
seat tracks

The previous restorations shop did a nice job cleaning out the tracks, but never put the balls back. Perhaps these balls were already missing when they restored the car, but whatever the case, new balls were needed so the seat would slide correctly. Luckily these were the same design as the 2+2, so the balls and insertion technique worked the same way.


Reminder:
2011 Annual Pledge Drive

Donations can be sent via Paypal through clicking this button below, or sent to my paypal account: tom@tomyang.net

donate

You can also send checks made payable to Tomyang.net LLC

Tomyang.net LLC
P.O. Box 36
Hollowville, NY 12530

Thanks everyone for your support and I hope you like what you see on this website.

Tom Yang

Previous Restoration Day
Next Restoration Day
Home page

2259

December 24, 2011


12/24/11
250GTE 2259: Seat Belts and Interior Details

rear seat

I finally finished up the rear seat area on the Survivor GTE which included new seat belts. It took a lot of coordinating to get this done since there were no seat belt mounts. We needed to fit the rear seat several times when fitting the anchors for the belts so they could be welded in place and fed through the seat cushions without obstructions. I don’t like using the big washers often found on some seat belt installations, as they are usually bolted straight through a floorpan section. Welded in mounts are far more secure, and I feel worth the extra time.
carpets

I wanted to make a set of over mats for the front carpets since we had some extra carpet. The original carpet (foreground) will be installed, but a second carpet will sit over this layer for everyday use. I had some extra matting from another project to sew in a durable heel pad.
transmission tunnel

The old crumbly foam was removed from the transmission tunnel, so I had to replace it with new material.
covered

I’m always amazed how well the original leather from this car has held up over the last 45 years, and with the new padding it will go back in the car with very few wrinkles.
ash tray

As the little details are being sorted, I wanted to make a point of showing the rear ash tray stand mounted in the rear of the car. I’ve seen upholsterers finish this piece with a regular piece of leather, but it always looks a little puffy or thick.
leather

The original leather was “skived” or shaved thin before gluing it onto this piece of leather. It’s paper thin and is a little detail sometimes missed by upholsterers. Skiving leather is an extra step that is often skipped to save time, but it gives the piece the correct look.
seams

The results of the thin leather are subtle, but it makes for sharper creases on the edges and there is less puckering at the corners. There are several other places in a GTE interior that have thin leather, but these details are often lost when modern upholsterers eliminate the extra steps.


Reminder:
2011 Annual Pledge Drive

Donations can be sent via Paypal through clicking this button below, or sent to my paypal account: tom@tomyang.net

donate

You can also send checks made payable to Tomyang.net LLC

Tomyang.net LLC
P.O. Box 36
Hollowville, NY 12530

Thanks everyone for your support and I hope you like what you see on this website.

Tom Yang

Previous Restoration Day
Next Restoration Day
Home page

330GT Repairs

December 20, 2011


12/20/11
330GT Repairs

330GT

A Series I 330GT 2+2 was dropped off at the shop with a list of about 5 items, so I put her up on jack stands to try and get the car in and out!
radiator

The radiator had developed a leak so the hood had to come off for the radiator to come out. We sent it out to our radiator guy to take a look at it.
front hub

The owner said he was hearing some noise from the front right wheel and suspected a wheel bearing was going bad, so I took a look. It definitely had some play in the hub, so I pulled the hub off and found a disintegrating outer wheel bearing.
bearing

The bearing cage was broken and a couple of the ball bearings were MIA.
spacer

The bearing spacer was showing some bluing from excessive heat, so bringing the car in for service was done just in time!
5839

Speaking of 330s, Ben sent me pictures of his RHD Series I 330GT several months ago from a show he attended. It was a lot more finished than when I saw it over a year ago In Oceanside, CA. Here’s the original post about Ben’s 330GT.


Reminder:
2011 Annual Pledge Drive

Donations can be sent via Paypal through clicking this button below, or sent to my paypal account: tom@tomyang.net

donate

You can also send checks made payable to Tomyang.net LLC

Tomyang.net LLC
P.O. Box 36
Hollowville, NY 12530

Thanks everyone for your support and I hope you like what you see on this website.

Tom Yang

Previous Restoration Day
Next Restoration Day
Home page

GTE Progress

December 18, 2011


12/18/11
GTE progress

rear seats

With the engine installed in the Survivor 250GTE, I decided to focus my attention to the interior for a little bit. The rear defroster fan motor needed to be installed, along with fixing some of the old wiring. After the rear panel was installed, I trimmed in new foam on the rear well arches. The old foam was removed several months ago because it was all loose and crumbly.
rear seat sections

The original leather covers were in great shape, but not as pliable as new leather. Most of the wrinkles have come out with the new foam, considering the old leather, but I’ll continue to work the leather as it takes a set.
rear carpet sections

Some of the carpets pieces were curiously replaced years ago with mats that weren’t even close to matching the original carpets. I managed to find a carpet that was close to the Wilton Wool type carpets and cut them to fit the missing spaces. I’ll take these pieces to my upholsterer to sew new binding on the edges of the carpets.
GTE

As I got closer to finishing 2259, Francois and I delivered another GTE to its owner. This GTE has been at the shop for all to long. Through the years, this car has received an engine rebuild, then it got a new interior, and after that, it was painted. The owner was in no rush to get this car back, but as it neared completion, he was excited to get his car back!
engine

This car was one of the first projects outside of my own car I was intimately involved with, and I have fond memories seeing all the parts I had something to do with.
interior

The interior was done by Frank Segreto, and although he passed away a few years ago, his work lives on in this car.

It was sad to see an old friend go away, but it was also nice to send her his owner could become re-acquainted!

brake equalizer

I sent Karp’s Brake Service another brake equalizer for them to rebuild, but the large nut that seals the unit was really seized. You can see from this picture of another unit how the pieces fit together. There is a flat section on the equalizer that can be clamped to a vice, but for really stuck nuts, this flat section really gets chewed up. To make things worse, when enough force is applied to the aluminum casing, it can crack.
nuts

Ron Karp and I discussed alternatives to chewing up the aluminum case and risking breaking an irreplaceable aluminum casting. One solution was to machine the steel nut out of the body of the aluminum case, and replacing it with another nut. I contacted Morten Mortensen of http://www.montimatic.dk/ the machine shop that made the pushrods for the same unit. Morten owns a GTE and was happy to help make the nuts.
brake equalizer nut

Within a couple of weeks, I had the parts in my hand and now Karps Brake Service has a safe alternative. Thanks Morten!


Reminder:
2011 Annual Pledge Drive

Donations can be sent via Paypal through clicking this button below, or sent to my paypal account: tom@tomyang.net

donate

You can also send checks made payable to Tomyang.net LLC

Tomyang.net LLC
P.O. Box 36
Hollowville, NY 12530

Thanks everyone for your support and I hope you like what you see on this website.

Tom Yang

Previous Restoration Day
Next Restoration Day
Home page

275GTS 7039

December 17, 2011


12/17/11
275GTS 7039: Floorpan Replacement

GTS floorpan

After stripping the car, we found most of the structure of this Ferrari convertible to be pretty sound. The floors had the typical water traps that caused the original unpainted surfaces to rust through. We decided to go ahead and have our “floor guy” replace the rotted floor sections with newly fabricated pieces. The job began by carefully removing the original panels so templates could be made and sections fabricated.
weld through primer

Once all the rusty and thin sections were removed, the surfaces were cleaned and a weld through primer was painted on all the mating surfaces. Ferrari did not paint any of these panels, and if there was any water present, they rotted away pretty quickly. Any amount of paint or surface prep will go a long way to making these floor last a lot longer.
floor pan sections

Jay took the old panels to his shop and fabricated new pans to install the next day. None of these pans have right angles so they’re all trapezoidal in shape. The hand made nature of these cars even show in the way the floor pan sections were installed. The original panels were pretty crudely attached and although we tried our best to replicate the original floors, I couldn’t help but ask Jay to improve some of the work.


Reminder:
2011 Annual Pledge Drive

Donations can be sent via Paypal through clicking this button below, or sent to my paypal account: tom@tomyang.net

donate

You can also send checks made payable to Tomyang.net LLC

Tomyang.net LLC
P.O. Box 36
Hollowville, NY 12530

Thanks everyone for your support and I hope you like what you see on this website.

Tom Yang

Previous Restoration Day
Next Restoration Day
Home page

275GTS 7039

December 10, 2011


12/10/11
275GTS 7039: Engine Disassembly

valves

I disassembled the heads by removing the valve springs, keepers, shims, and valves. I kept everything in order on a piece of cardboard so if we found any irregularities in the head, we could inspect the correlating valve for problems.
heads

A couple of cylinders showed a lot of carbon build up which meant this engine must have smoked pretty badly before it was parked almost 40 years ago.
valves

It looks like the head still had the original valve guides and seats without provisions for a valve stem seal. These guides would allow a lot of oil to dribble down the valve stem as the guide wore causing a lot of smoke. You can see how all this oil burned up near the exhaust valve (smaller port) leaving enough coke to nearly clog the exhaust port.
nova pistons

When I pulled the pistons out of this engine, I didn’t see the familiar shape I found in OEM Ferrari pistons, and when I showed Francois, he immediately recognized them as Nova pistons. He explained that “NOVA” was an aftermarket piston back in the 60s and 70s, and were common replacements for Ferrari engine rebuilds.
nova pistons

He showed me where to find the “NOVA” stamp underneath the piston crown. 
borgos

Borgo pistons have a specific rounded casting on the back side of the piston skirt. These were the original Ferrari pistons installed on these engines when they were new. 
borgo

The BORGO stamp can be found on the top of the piston.

Modern replacements are readily available made by several manufacturers, but it’s fun to see what original and period replacement parts looked like. We also discussed why this engine received new pistons so early on. On closer inspection of the NOVA pistons, we found them to be standard 77mm bore for the 275cc combustion chamber, so the cylinder walls were not over bored. Francois’ guess was the the new pistons were an attempted cure for the smoking problem. The one piece oil rings of the original Borgos were replaced with the Nova pistons which used a three piece oil ring to try and stop some of the smoking. Unfortunately, nothing was done about the valve stems, so the engine continued to smoke. 

New pistons, valve guides, seats, will be part of this standard rebuild. We’ll take some measurements and see what size replacement pistons will go into this engine and place our order in the next couple of weeks.

It’s just a couple more weeks left to the 2011 Tomyang.net pledge drive, and I want to thank everyone for contributing. It keeps me energized to bring you more every year!

I’ll be posting a list of contributors at the end of the drive, but I want to take moment to thank some of my customers for allowing me to share some of the work I have done on their cars for this website. Without their approval, this site would not have the variety of work and interesting projects to follow, and I want to let them know how much I appreciate their permission. I’m sure many of you out there can live vicariously in Ferrari ownership and repair through some of the cars I’ve written about through the last year, and owners of cars can learn what to expect when it is time to do the same repair on their own car.It’s a win win for everyone.

Donations can be sent via Paypal through clicking this button below, or sent to my paypal account: tom@tomyang.net

donate

You can also send checks made payable to Tomyang.net LLC

Tomyang.net LLC
P.O. Box 36
Hollowville, NY 12530

Thanks everyone for your support and I hope you like what you see on this website.

Tom Yang

Previous Restoration Day
Next Restoration Day
Home page

275GTS Suspension and Engine Disassembly

December 7, 2011


12/7/11
7039: 275GTS Suspension and Engine Disassembly

suspension dirt

Finally, the last piece of suspension came apart. The ball joints came out, and the front spindles were removed. To keep the dirt out of our wash tank, I scraped some of the accumulated dirt off the suspension pieces. It was amazing how much grime was on the car considering the mileage on the odometer.
speedo

The speedometer on this car was in miles per hour, and showed a total of 20,753 on the odometer. Considering this car has been parked since 1974, we guessed this was probably correct for its age, but there are signs that have been proving otherwise. Although I doubt the mileage could be 120,753, the signs show more mileage than a mere 20K miles. The first clue has been the amount of dirt and grease we found all under the car. Ferraris leak oil, and this attracts a lot of dirt, but the accumulations seems excessive. We’ll continue to look for clues, but the verdict is still out if this car is an actual low mileage car.
275GTS engine

One of the main places to look for clues to the mileage is in the engine, so I was anxious to tear into it. With the valve covers off, I found the roller followers to be perfect without any signs of marking, but the adjuster screws were all badly worn. These two signs canceled each other out to prove the mileage on this engine.
head puller

I installed a head puller after removing the valve covers preparing for a fight. Some heads can really be stuck to the block when the head studs corrode to the aluminum head. The process involves attaching a head pulling fixture to the head, and slowly applying pressure to the the head with long bolts. Eventually, the head will release and the head will inch its way up off the head studs.
head puller

Luckily, both heads came off without a problem, and the head studs had very little corrosion. Either this engine had been apart once before, or had seen little mileage. Still no verdict on the mileage.
pistons

There was definitely rust in the cylinder walls from the long dormancy, but luckily the engine was not seized. From the look of the deposits on the pistons, this engine had smoked a lot, maybe too much for 20K mileage.
oil pan

Next to come off was the oil pan. The fins on the pan often show how many miles were on the car from the amount of scars on the aluminum sump. This pan was pretty nick free much like 2259 which was definitely a low mileage survivor car.
oil pump

The oil pump pickup has to be disconnected so the timing chain case can be removed. It’s connected to the pump with a soft rubber hose. In the past, Francois and other engine builders have seen the incorrect hose used at this pipe. Inexperienced or unknowing mechanics would have used a piece of heater hose for this connection. As it was submerged in oil, the hose would disintegrate and cause suction issues for the oil pump. Needless to say, loss of oil pressure can cause catastrophic engine problems. Replacing this little hose unfortunately means an engine out procedure, so using the the right hose would be a good idea for many reasons!
pistons

With the timing chest out of the way, I focused removing all the pistons. We’ll measure them to see if they’re still the original standard bore size.
crank

By the end of a day, I had only the crank and main journals left to remove, but huge pile of parts that will need to be cleaned.

I want to thank everyone who donated so far to to my annual pledge drive. Your pledges and support continue to motivate me to shoot more video and share them on this website. This past year, I added several more videos to my you tube channel, and plan to do more. I love sharing some of the experiences I have with the web, and hope you’re enjoying the videos as well.

Here is a video I shot out in Monterey with John Surtees talking about racing a GTO.

I especially liked the visit with Marshal Buck, and the visit to CMA Models. I learned a lot about the world of high end model building.

You can see more at my YouTube Channel.

Donations can be sent via Paypal through clicking this button below, or sent to my paypal account: tom@tomyang.net

donate

You can also send checks made payable to Tomyang.net LLC

Tomyang.net LLC
P.O. Box 36
Hollowville, NY 12530

Thanks everyone for your support and I hope you like what you see on this website.

Tom Yang

Previous Restoration Day
Next Restoration Day
Home page

7039

December 5, 2011


12/5/11
7039: 275GTS Suspension and Parts Cleaning

suspension

The suspension was next on the list that needed to come off. 
suspension

As the parts were removed, I took notes on how the pieces were oriented and how many spacers were installed at the A-arm mounts so we could get the camber settings close when the parts go back on.
brakes

The brake parts were sand blasted and inspected. The caliper frames will be sent out for plating while the brake caliper pistons will be sleeved and rebuilt.
grease

With the engine out of the car, I wanted to get the heavy grease and dirt off before tearing apart the engine.
washed

A good soaking in engine degreaser and a power washing took off most of the grease and some of the loose paint.
transaxle

The transaxle got the same treatment.
front suspension

After the rear suspension was broken down and sorted, I turned my attention to the front suspension.
front suspension

After a little while, I had all the pieces on the floor and so more labeling and inspecting could be done. The hub and ball joints will be broken apart and cleaned. Next in the process was the removal of the steering box and associated pieces.
suspension pieces

As I worked on removing the parts and labeling, Alvin, our shop helper, spent time with the suspension pieces at the parts washer and sand blasting cabinet. We’ll remove the bushings and send these parts out for powder coating.
suspension pieces

We started separating parts for the various finishes. Some pieces need paint, while others need plating. As we accumulate all the parts, we’ll send them out in batches.
rear suspension marks

We also took notes and pictures on markings made on the springs before the paint was removed. These marks were made by the Ferrari factory to aid in the assembly of the suspension pieces, and we’ll replicate these marks on the springs after powder coating.


Reminder:
Please consider contributing to my annual December Pledge drive. Your donations help keep this website a useful resource and destination for all Vintage Ferrari Enthusiasts, Owners, and Future Owners.
party

I also use your contributions to fund some of the parties I hold at various locations around the country. It’s a great chance to tomyang.netters to meet in person and chat all things Ferrari. Last year, we had a nice party at my sister’s house in Savannah during the FCA National event, and I hosted another cocktail party at Quail Lodge in August.

As much as this website allows all of us to keep in touch virturally, it also is a great way to bring us all together in person. If you have not had a chance to join us at one of my events, I hope you’ll get a chance next year. So far, the schedule for next year is for me to be at Cavallino in January, Maryland in May for the Radcliffe/Tomyang.net show, and Monterey in August. As usual, other dates may be added, and I’ll let everyone know as I make the changes.

Donations can be sent via Paypal through clicking this button below, or sent to my paypal account: tom@tomyang.net

donate

You can also send checks made payable to Tomyang.net LLC

Tomyang.net LLC
P.O. Box 36
Hollowville, NY 12530

Thanks everyone for your support and I hope you like what you see on this website.

Tom Yang

Previous Restoration Day
Next Restoration Day
Home page

7039

December 4, 2011


12/4/11
7039: 275GTS Dash and Engine Removal

dash

The dashboard came out this week and it needed to be disassembled so three shops could do their work. The padded portion will go to the upholsterer, the chrome trim will go to the plater and the wood portion will go to the carpenter.
dash

With the padded dash removed, I had access to the screws that held in the chrome trim.
dash hole

The wood dash will need a hole filled by our wood specialist. A previous owner installed a radio by crudely cutting a hole in the center of the dash. The wood dash on vintage Ferraris have wood veneered faces, and we’ll have to match the species of veneer with the original laminiate after the holes are filled.
dash wiring

With the dash removed, the all the dash wiring was exposed and I had easy access heater core and ignition switch.
ignition switch

Even though I took notes and made drawings of the ignition switch, I took the extra precaution of photographing the wiring. Digital technology has really helped the process of restoration because I can take as many photos as I want with my digital camera without having to processes it at the lab. It also helps to preview the pictures with a digital camera to make sure the picture is clear before moving on. In the past, one would not know if the photo was clear enough until the roll of film was developed several weeks later after everything was disassembled and too late to retake the photo. Also, without Digital photography, we wouldn’t even have this blog! Let’s take moment and thank the development of digital technology!
heater box

I took the heater box out from under the dash and found a crudely made replacement door. I’ll have to find the correct door to put back in the car.
engine

We unhooked all the various pipes, linkages, and mounts from the engine, and pulled it from the car. It was covered in a layer of grease and dirt and was in desparate need of the washing. We’ll power wash the excess grease and dirt before taking it apart to avoid bringing unnecessary dirt into the parts washer.
engine compartment

With the engine out of the car, we can begin removing the front brake lines, fuel lines, steering box, and wring harness.


Reminder:
Please consider contributing to my annual December Pledge drive. Your donations help keep this website a useful resource and destination for all Vintage Ferrari Enthusiasts, Owners, and Future Owners.

I try to help steer owners in the right direction on problems they might have with their cars. Besides the Vintage Ferrari Forum where others can share advice and information, I also field e-mails every week from owners about their cars, and I try my best to help. If you’ve benefited from my help, this is your chance to show your appreciation!

Donations can be sent via Paypal through clicking this button below, or sent to my paypal account: tom@tomyang.net

donate

You can also send checks made payable to Tomyang.net LLC

Tomyang.net LLC
P.O. Box 36
Hollowville, NY 12530

Thanks everyone for your support and I hope you like what you see on this website.

Tom Yang

Previous Restoration Day
Next Restoration Day
Home page

2011 December Pledge Drive

December 1, 2011


12/1/11
2011 December Pledge Drive

It’s pledge drive time again, and your pledges help keep this website moving smoothly. This year we surpassed 3 gigabytes of data on my server which may not sound like a lot, but that accounts for nearly 9000 images I’ve taken and posted to the journal entries, not to mention the images people post to the Vintage Ferrari Forum. Looking to the future, I upgraded the server for more space and bandwidth so I can continue to meet the demands of a still growing web community, but enough of the technical stuff, let’s review what happened in 2011.
cavallino

January almost always brings me to Cavallino, and this year was no different (click on the picture)
Taxman

Cavallino may have been fun, but I had more fun visiting a fellow Ferrari owner and poking through his collection of stuff.
daytona spyder

I worked on a bunch of different cars this year. This Daytona Spyder needed some new oil seals on the transaxle.
330

This Series I 330 needed a good tune up and general service.
5053

I even found time for my personal car, and finally sorted out the brakes, and in the process, helped many others with the correct parts to rebuild the brake equalizer unit.
two Ferraris

I continued prepping 1747 for the National Ferrari show and received a new car at the shop. It was a 250GTE that was parked in 1969, and I managed to get it for a customer interested in preserving this car as a “survivor car.” The process began in April.
Radcliffe Party

May brought on the annual Radcliffe/Tomyang.net Spring car show in Maryland. It’s gotten bigger, and we’re finally feeling like we got the hang of putting on a car show!
PF Coupe

I headed down to Savannah in June to show 1747 at the FCA National Event. An article on this special PF Coupe appeared in Forza Magazine the same time!
Quail Party

Fast forward to August in Monterey where this year I manged to score space at the Quail Lodge for a Tomyang.net gathering.
Surtees

I got to spend some time at Pebble Beach and meet John Surtees!
330

Plenty of work was waiting for me when I got back the the East Coast.
2259

The GTE project was progressing nicely, and there was lots to share on the website.
275GTS

Just when you think there aren’t any more barn finds, another pops up! This time it was 275GTS that a customer of ours purchased. It needs a full restoration after sitting in a garage for nearly 40 years, but we’ll all get to watch this car come back to life on this website!

Looking back on 2011, I realized I had a very busy year, and I was happy to share it with you all on this website. It was great to see some of you in person at the various events and shows I attend or host, but for those that can’t join me in person, I hope the pictures, videos, and stories offer the next best thing. As much as I now make a living at working on Vintage Ferraris, this website still allows me to share my passion with everyone around the world. If you feel you’ve benefited from this website, consider a pledge to keep this community alive and growing. I’m looking forward to seeing what 2012 will bring to the Vintage Ferrari world and I hope you’ll join me!

Donations can be sent via Paypal through clicking this button below, or sent to my paypal account: tom@tomyang.net

donate

You can also send checks made payable to Tomyang.net LLC

Tomyang.net LLC
P.O. Box 36
Hollowville, NY 12530

Thanks everyone for your support and I hope you like what you see on this website.

Tom Yang

Previous Restoration Day
Next Restoration Day
Home page