Hey everyone,
Has anyone found a proven method of adjusting the valves on a 330 engine. I refered at Allen Bishop`s book, but found it to be vague as far as the actual sequence beyond the initial(#1 cylinder). I am looking for a proven step-by-step method with easy to follow instructions. Can anyone be of assistance?
Thanks in advance,
Giovanni
Valve adjustment

Re: Valve adjustment
Hi GIovanni,
The way Francois has taught me to do a valve adjustment is to do the following assuming the valve covers are already off.
Connect a remote starter switch to from the positive side of the battery to the starter circuit located on the fuse panel. When the momentary switch is turned on, the starter should kick over if you have it hooked up right.
Start with any side of the engine you want as long as you deal with them as a six cylinder engine. Bump the starter until you see the both valves reach equal tension on the lobe of the cam. When #1 cylinder is at this point, you ADJUST #6 CYLINDER. The next cylinder to watch is when both #2 cylinder valves reach equal tension, you ADJUST #5 Cylinder. Watch #3 cylinder to adjust #4, watch #4 to adjust #3, watch #5 to adjust #2, and watch #6 to adjust #1. It sounds confusing, but when you look at the 6 cylinders facing you, you work from the outside in, watching one side of the engine for the valves to come into tension, and adjusting the opposite cylinder.
When the valves are both in tension, that cylinder is on the end of the exhaust stroke, but the opposite cylinder is on its compression stroke. That is when you want to adjust the valves.
Hope this makes sense.
Tom
'63 330 America #5053

Re: Valve adjustment
Rather than a remote starter switch, I put the car in first, and bump/roll it to get the cams in the right position for each adjustment. When the car has rolled too far forward, I put it in reverse to continue the process while I bump it to the rear now. Of course, the car has to be on a very level hard surface for this to work. This also works well if one is trying to set the point gap with the distributors on the engine. It is quite easy to get the points setting on the high spot of the cam.
Regards, Kerry
http://www.330gt.com 330 GT Registry
http://www.parrotbyte.com/kbc/ferrari 250 PF Coupe 1643GT, 330 GT 2+2 8755GT, 308 GTS 23605
http://www.330gt.com 330 GT Registry
http://www.parrotbyte.com/kbc/ferrari 250 PF Coupe 1643GT, 330 GT 2+2 8755GT, 308 GTS 23605
-
John Vardanian
- Posts: 1908
- Joined: Wed Sep 04, 2002 12:13 am
- Location: San Francisco Area
Re: Valve adjustment
Hi Kerry,
I do something a little different that is less taxing to the engine and your back. Lift one wheel off the ground and with the gearbox in top gear turn the wheel forward. You'd be suprized how easy it is to turn the engine this way. Turn the wheel till cyl 1 lobes are at 10-2 position, and so on.
john
PF Coupe
-
John Vardanian
- Posts: 1908
- Joined: Wed Sep 04, 2002 12:13 am
- Location: San Francisco Area
Re: Valve adjustment
Thanks Tom.
Kerry, taking out the plugs is an important step... that I forgot to mention. With the plugs in you'll pop a hernia trying to turn the rear wheel.
john
Kerry, taking out the plugs is an important step... that I forgot to mention. With the plugs in you'll pop a hernia trying to turn the rear wheel.
john
PF Coupe
-
Jim Wickstead
- Posts: 68
- Joined: Mon Jan 13, 2003 12:41 am
- Location: new jersey
- Contact:
Re: Valve adjustment
Giovanni,
I have a less traditional way of adjusting the valves that works well for me. The problem I find is with the single cam engines the rocker housings obscure the view of the lobes.
However, there is a firing order, the valves all reach top dead center 30 degrees from each other. and the distributors are in sync with this.
to adjust the valves, I first bring the engine to #1 TDC on the flywheel. remove the valve covers and make certain #1 cyl is on the compression stroke. Put the distributors back on lightly with the caps removed. I then put degree wheels with the center cut out on the top of each distributor. (I Xerox the degree wheel, laminate them to cardboard so I don’t destroy my good metal one). I tape a wire pointer to the rotor and aim it at the degree wheel. Rotate the degree wheel until it lines up with the pointer and then tape it down. Adjust the valve gaps per specs and rotate 30 degrees. Observe the firing order and adjust the next cylinder in order. (It’s a good time to check the end of the rocker adjusters, too).
Rotate the engine by putting in gear and lifting the rear wheels off the ground, or on engines, where the engine pulley nut can be accessed, put in neutral and use a socket with long breaker arm. Much easier if you remove the spark plugs. (It’s a great opportunity to turn a 5 hr project into a 7 hr project).
Cheers!
Jim
-
Colin Angell
- Posts: 49
- Joined: Tue Apr 13, 2004 1:11 pm
- Location: Worcestershire, England
- Contact:
Re: Valve adjustment
Hi there
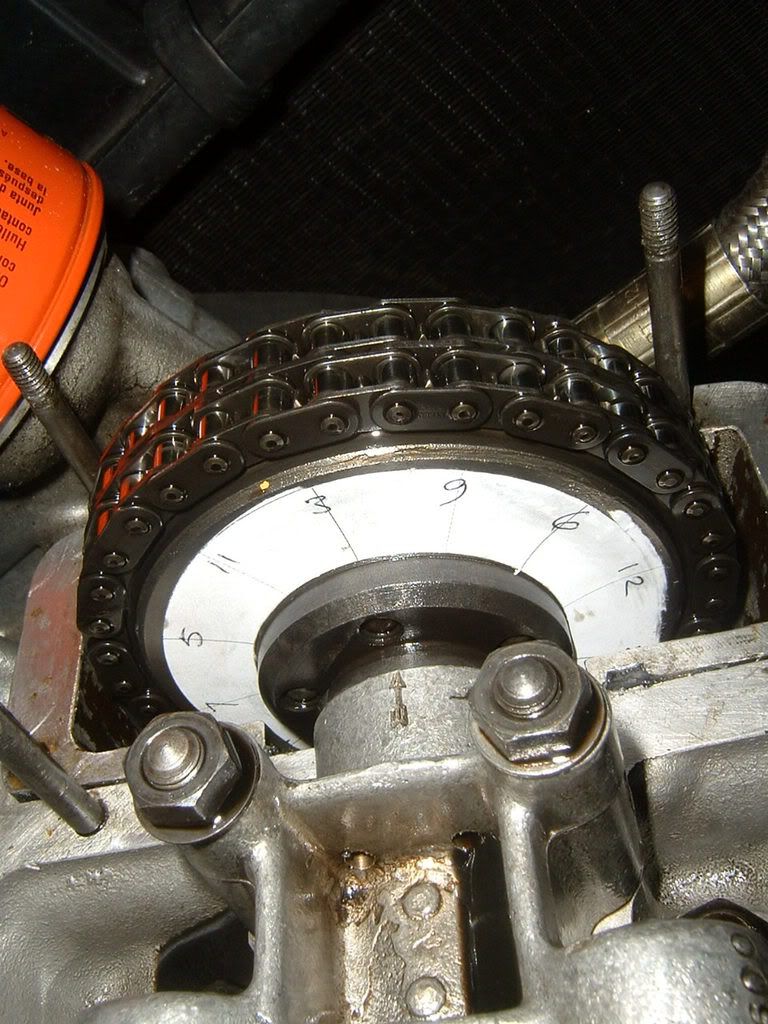
I have made an accurate degree wheel from paper, with divisions marked in firing order. I fix this to the inside face of the cam sprocket, lining up number 1 very carefuly with TDC and then move the car forward in fifth gear by pushing on a front wheel so I can easily see when the marks lign up with the pointer. In the photo, taken some while ago, the paper is just held to the sprocket with a dab of grease, but the idea works so well I have now made one with a magnetic back which can be used time and again.
It works for me!
Colin
-
Jim Wickstead
- Posts: 68
- Joined: Mon Jan 13, 2003 12:41 am
- Location: new jersey
- Contact:
Re: Valve adjustment
Colin,
That's a great idea. I'll try it out.
Jim
That's a great idea. I'll try it out.
Jim