Coils... again

Re: Coils... again
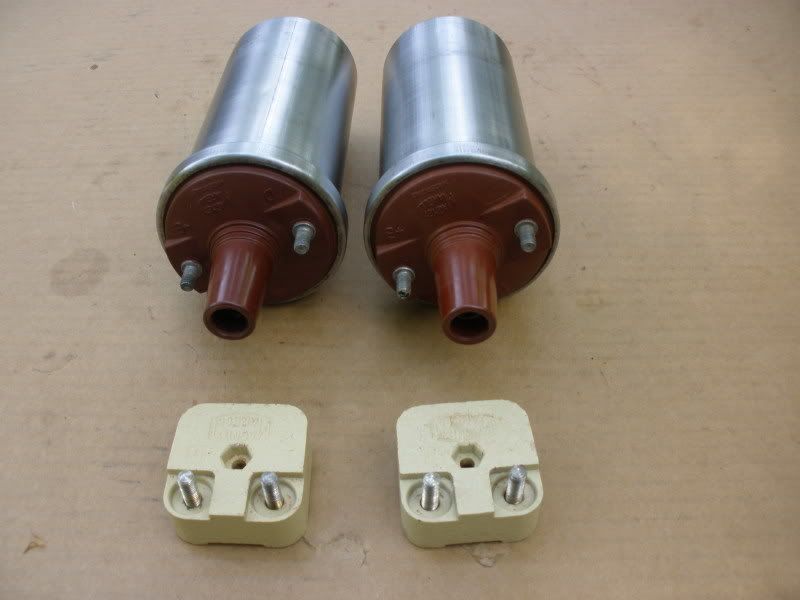
Second set of photos
- Attachments
-
- CornelisCoilSet2.jpg (114.37 KiB) Viewed 10189 times
Re: Coils... again
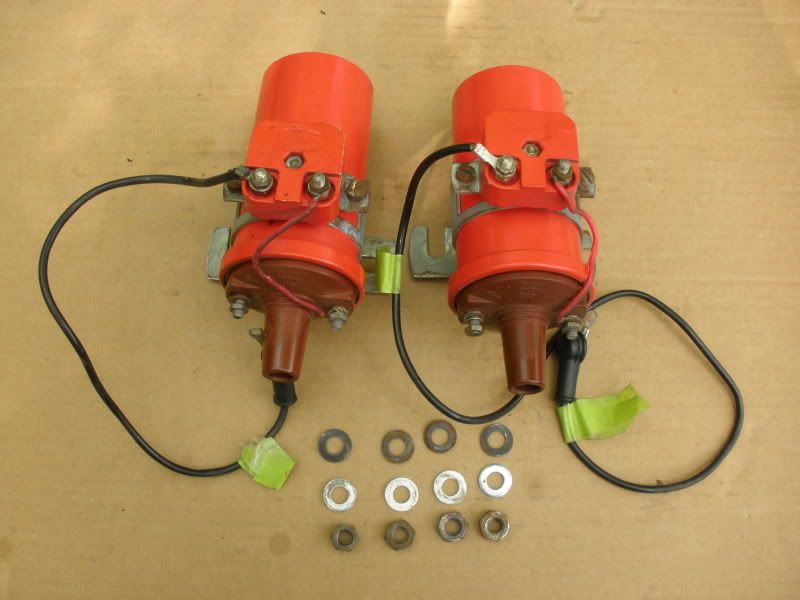
Third set of photos, also displaying the crimping tool used to crimp the top of the coil to the high tension wire 
Different sticker, red paint
Craig
Different sticker, red paint
Craig
- Attachments
-
- CornelisCoilSet3.jpg (112.35 KiB) Viewed 10180 times
Re: Coils... again
Fourth an final set. Great photos Cornelis, thanks for taking the time to send to me.
Craig
check out the terminal boots on the installed coil and notice how they do not fit the wire. Their purpose must be for electrical shorting protection and not weather proofing.
Craig
check out the terminal boots on the installed coil and notice how they do not fit the wire. Their purpose must be for electrical shorting protection and not weather proofing.
- Attachments
-
- CornelisCoilSet4.jpg (167.74 KiB) Viewed 10165 times
Re: Coils... again
Mr Carello , the last two dirty fotos are shot from my dailydriver.
wrong color of cords wrong boots and much more etc
the last three years no problem with any electric.
under the boots the wiring is isolated
FUNCTIONALITY is more important for me.......
nice days
ciao
Cornelis
wrong color of cords wrong boots and much more etc
the last three years no problem with any electric.
under the boots the wiring is isolated
FUNCTIONALITY is more important for me.......
nice days
ciao
Cornelis

Re: Coils... again
Probably stating the obvious, but - (BREV) = BREVETTATO = PATENTED ??????carello wrote:Interesting to note the sticker type, silver zinc bracket yet chromated resistor feet, (BREV) added to resistor marking, red solid wire routing.
Thank you
Craig
Tom Kizer
So many sidewalk cafés - so little time left.
1969 365 GT 2+2 S/N 12293 (Gone but not forgotten)
1967 230 SL 4-spd (Currently on CPR)
1969 365 GT 2+2 S/N 12293 (Gone but not forgotten)
1967 230 SL 4-spd (Currently on CPR)
Re: Coils... again
Whoops, i should have added, the boots Cornelis shows are the correct vintage boots as shown. This is how they are supposed to be ! They are large on the wire end! It is the nature of these boots.buurman wrote:Mr Carello , the last two dirty fotos are shot from my dailydriver.wrong color of cords wrong boots and much more etc the last three years no problem with any electric.under the boots the wiring is isolated FUNCTIONALITY is more important for me......nice days ciao
Cornelis
Here is a collection from oem Marelli coil applications. Some people collect stamps, some people collect coins, some people collect dust, but real people collect rubber boots from old Marelli coils off V12 applications.
Craig
- Attachments
-
- MarelliCoilWireBoots1.jpg (31.57 KiB) Viewed 10110 times
-
John Vardanian
- Posts: 1908
- Joined: Wed Sep 04, 2002 12:13 am
- Location: San Francisco Area
Re: Coils... again
A question about the stamping on the resistors... is it just a surface/superficial stamp or is it a stamping into the ceramic casting of the unit, done before baking. Mine was painted over and once I removed the paint there was no trace of any lettering. Thanks.
john
john
PF Coupe
Re: Coils... again
A couple more great coil photos from Cornelis.
The red coil seems to be embossed - 12V B20D8
note: the truncated Marelli logo on the bare white resistor. This is an early sixties trait, my guess 1962 thru 1965.
The black coil is embossed - 12V BZR200D
My later coil with black Bakelite and red metal BZR201A is not embossed anywhere, simply heat stamped in the top land area. The resistor has a full oval Marelli logo.
Craig
- Attachments
-
- CoilBottom_1617.jpg (117.02 KiB) Viewed 10015 times
-
- Coil bottom_1618.jpg (129.01 KiB) Viewed 10014 times
Re: Coils... again
John, my research so far seems to show a simple stamping of off white or yellow ink or paint.John Vardanian wrote:A question about the stamping on the resistors... is it just a surface/superficial stamp or is it a stamping into the ceramic casting of the unit, done before baking. Mine was painted over and once I removed the paint there was no trace of any lettering. Thanks.john
Are your red top coils stamped with data on the top land area? If so, how are they marked?
Nice detail work John, You know there is a thick (1.5mm) gasket between the resistor and it's metal bracket. Maybe just a soft isolator?
thank you
Craig
- Attachments
-
- ResistorPrint1200a.jpg (93.96 KiB) Viewed 10009 times
-
John Vardanian
- Posts: 1908
- Joined: Wed Sep 04, 2002 12:13 am
- Location: San Francisco Area
Re: Coils... again
Hi Craig,
The 1.5 mm gasket is actually a gelatin like translucent film.
john
The 1.5 mm gasket is actually a gelatin like translucent film.
john
PF Coupe
Re: Coils... again
Two more photos from Cornelis, thank you.
first is a clearer view of the BZR200A red top coil and its stamping.
second is a closer view of the 6P resistor with full oval ( i dont know if the full oval is really a period trait or not as the sample we have is too small at this time).
Looks like i cant load the photos at this time - some sort of restart is needed due to a windows update - tomorrow i guess.
Craig
-
John Vardanian
- Posts: 1908
- Joined: Wed Sep 04, 2002 12:13 am
- Location: San Francisco Area
Re: Coils... again
A few questions...
1. What is the finish of the nuts and washers that hold the coils' brackets to the bulkhead?
2. The red wire that couples the coil to the resistor, is it solid or stranded?
Thanks.
john
1. What is the finish of the nuts and washers that hold the coils' brackets to the bulkhead?
2. The red wire that couples the coil to the resistor, is it solid or stranded?
Thanks.
john
PF Coupe
Re: Coils... again
Two more photos from Cornelis, thank you.
first is a clearer view of the BZR200A red top coil and its stamping.
second is a closer view of the 6P resistor with full oval ( i dont know if the full oval at the bottom of the resistor is really a dateable trait or not as the sample we have is too small at this time).
Looks like i cant load the photos at this time - some sort of restart is needed due to a windows update - tomorrow i guess.
Craig
- Attachments
-
- The solid core red covered wire appears to be tin plated silver. A cZ flat washer is used at either connection (coil/resistor) then topped with a cZ split lock at coil or cZ ext star at resistor, then the cZ nut. cZ=clear zinc, yZ = chromated yellow zinc
Solid red wire ends are appropriately curled into nice loops at either end prior to installation. - BZR200A12V6F_1634.JPG (133.66 KiB) Viewed 9901 times
-
- 6PFullOvalYellowPrint_1633.JPG (85.25 KiB) Viewed 9901 times
Re: Coils... again
John Vardanian wrote:A few questions...
1. What is the finish of the nuts and washers that hold the coils' brackets to the bulkhead?
2. The red wire that couples the coil to the resistor, is it solid or stranded?
Thanks.
john
Hello John and Mr Carello all the answers by pics in your mail boxes
You will both soon be invited as the new judges at PB and the FEAR of all professional restaurators.
don forget to drive!
I hope for the readers :John's project will take some years more so we can expect more topics.
I have enough stuff for investigation, but are not so motivated in these kind of things ,but helping sending fotos is not the problem.
ciao
C.
-
John Vardanian
- Posts: 1908
- Joined: Wed Sep 04, 2002 12:13 am
- Location: San Francisco Area
Re: Coils... again
I have tried to mimic the color difference. When stripping the paint off the resistors, I found the color to be a very dark red. These colors are "Regal Red" for the coils and "Burgundy" for the resitors, both by Rust-Oleum.
john

john
PF Coupe